Accordion playing techniques
Shape sound with the bellows, connect notes with the fingers and build accompaniment with the left hand. Explore accordion techniques through short exercises and diagrams.
Mainly for acoustic accordions that play the same pitch in both bellows directions. The left-hand chapter uses standard Stradella bass. Smaller instruments may lack some buttons or registers.
The short practice examples below were written for this page.
From moving the bellows to playing the bass, let's practice accordion techniques together!
1. Dynamics and phrasing with the bellows
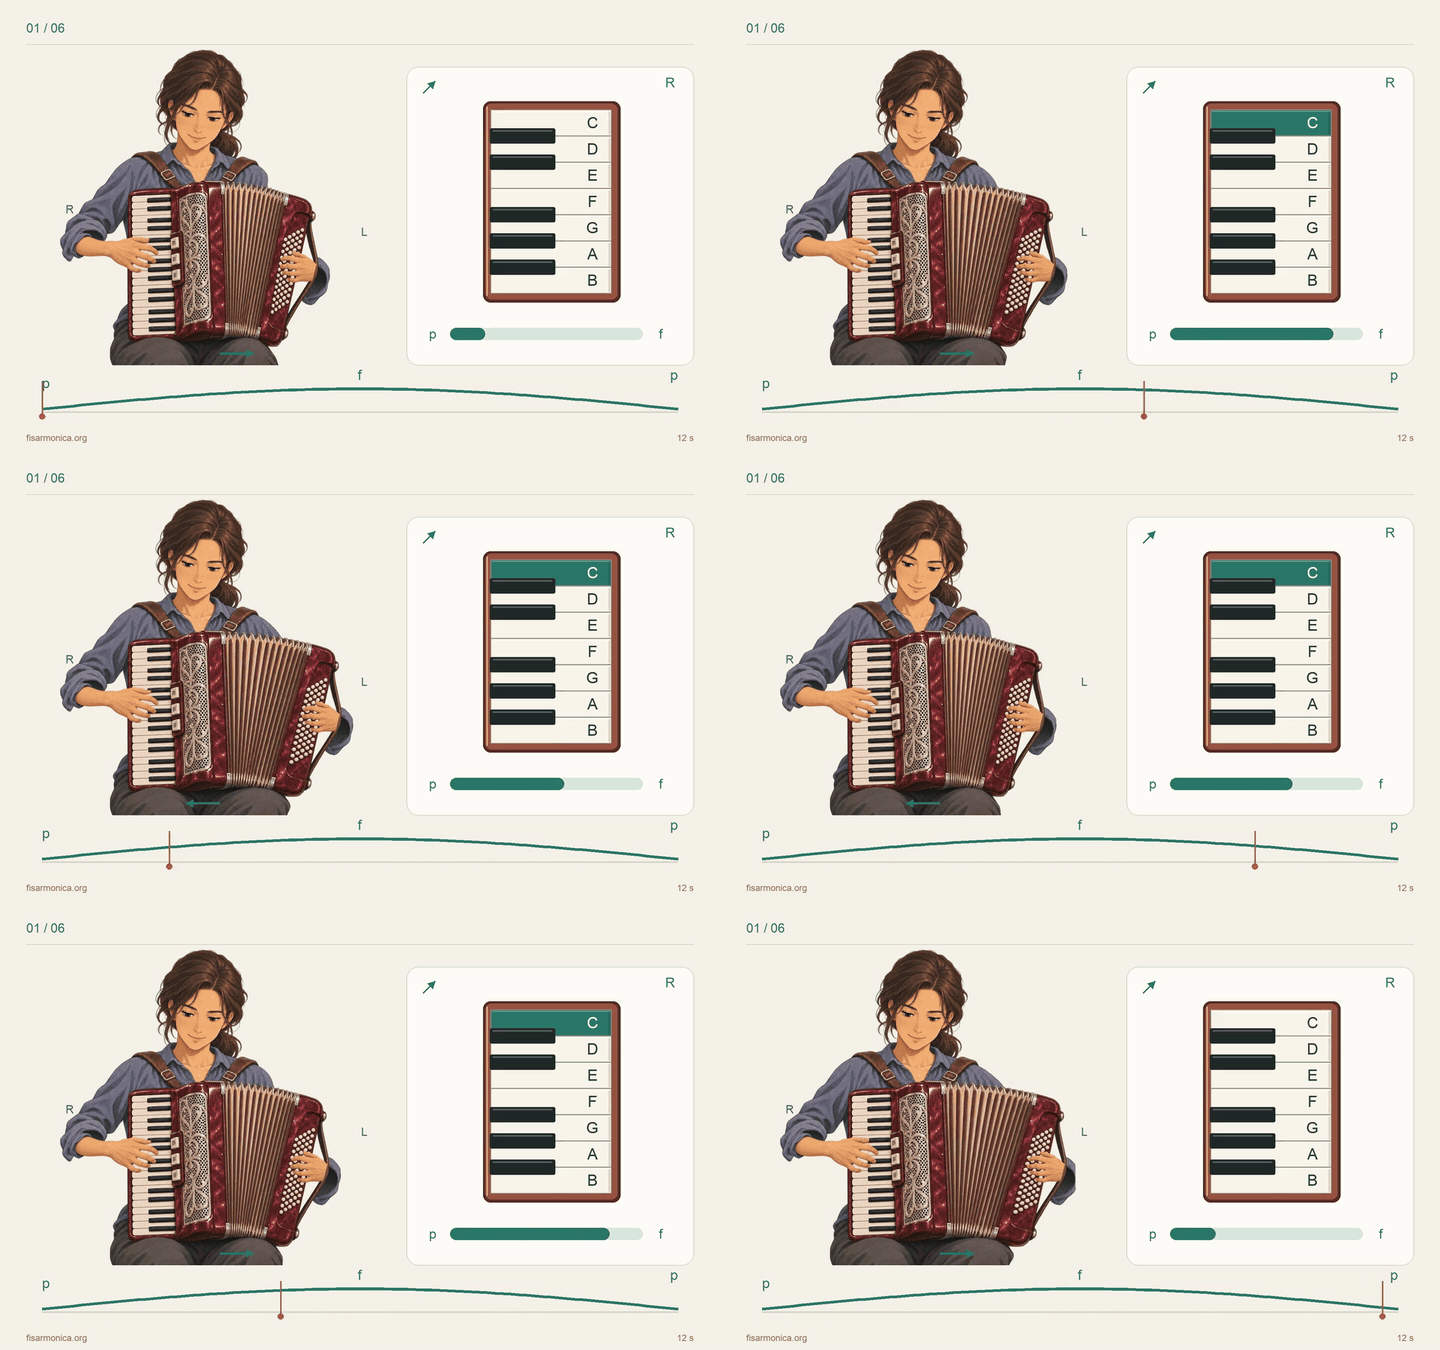
Control loudness mainly through bellows air pressure. A held note can grow louder or softer without releasing its key or button. Both hands share the bellows, so pressure changes affect both sides. [4]
A phrase is a musical thought. Decide where it leads and where it settles, then shape its dynamics. Rests and phrase endings are useful places to plan a change of bellows direction. [5]
Try it
Hold one right-hand note for four beats: grow a little louder for two beats, then softer for two. Try a short melody next and listen for unintended breaks.
One key stays pressed as the bellows move and the dynamics change from soft to louder and back to soft. The C key remains coloured in the close-up while it is held. Watch the dynamic indicator change during the held note.
An illustrated woman and close-ups of the controls show the movements. These are animated AI-generated illustrations, not filmed performances. In the front view, her right hand (keyboard) is on the left of the image; her left hand (bass) is on the right.
Reference demonstrations and explanations
2. Legato, staccato and accents
Vary how notes connect, end and begin. Start with steady bellows pressure to hear what changes when you alter the timing of pressing and releasing keys or buttons.
- Legato
- Join each note smoothly to the next. Coordinate finger changes with continuous airflow, avoiding unwanted overlap.
- Staccato
- Release the key or button early to leave a short gap. Duration and loudness are separate: try soft staccato too.
- Accent
- Give a note a brief increase in bellows pressure at its onset. This also affects other sounding notes, so coordinate it with accompaniment duration.
Try it
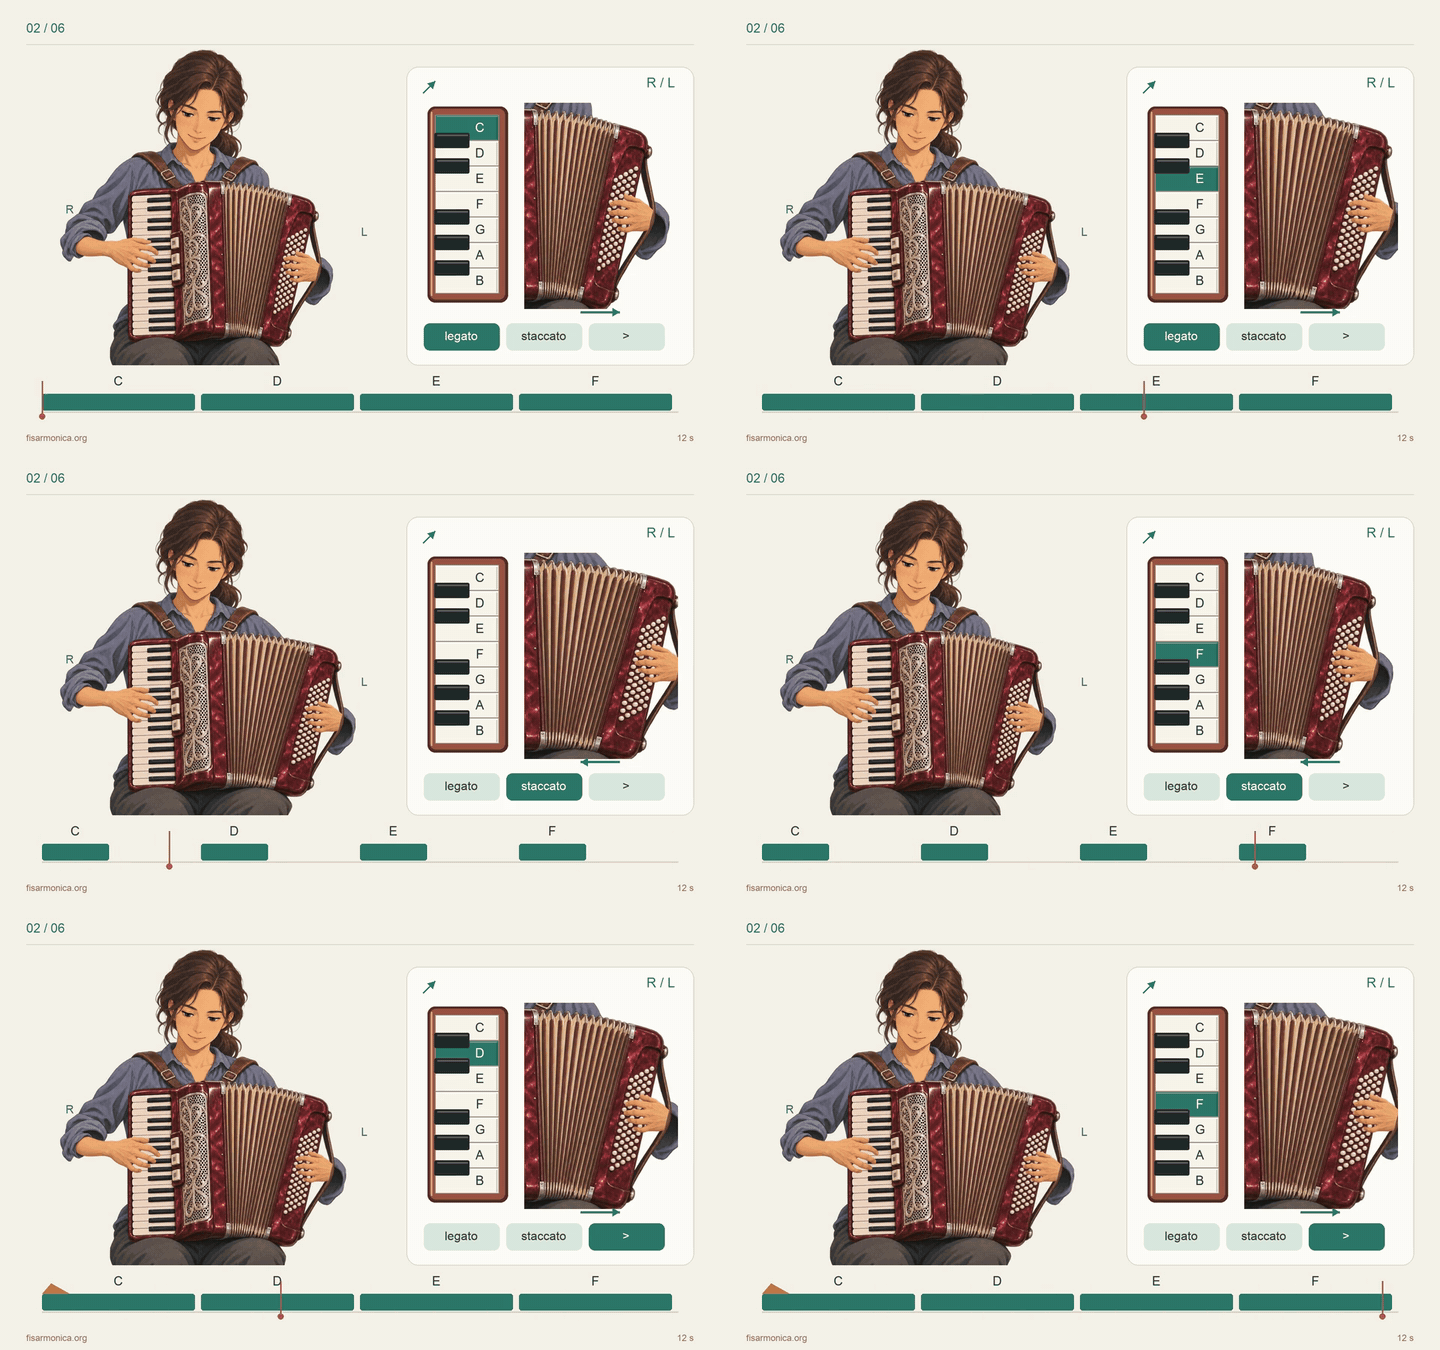
Play C–D–E–F at one tempo: smoothly, briefly, then with an accent on the first note. Keep the next note on time after the accent.
C–D–E–F is shown legato, then staccato, then with an accent on the first note. Only the pressed key is coloured; it returns to its original colour when released. In the final section, C lights up as the bellows make a brief impulse. Watch the gold arrow and “>” in the bellows close-up.
Reference demonstrations and explanations
3. Left-hand bass notes and chords
Stradella uses single-note bass buttons and buttons that sound preset chords. Start by alternating bass and chord, then combine buttons to form additional chords.
The bass layout follows the circle of fifths
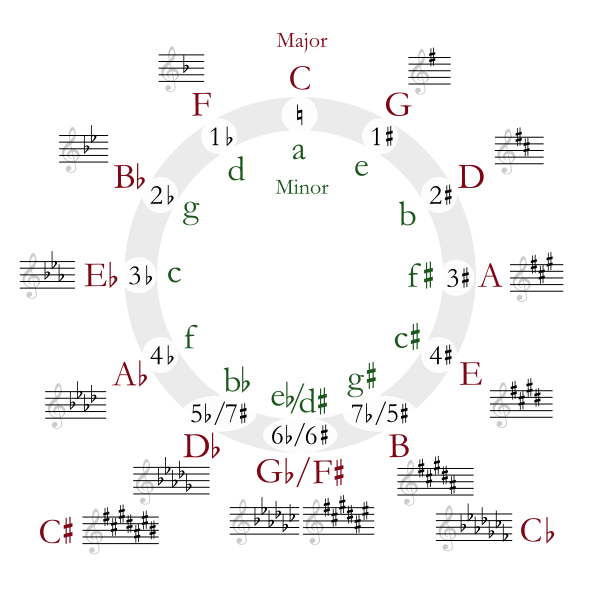
Next to C is G, then D. Stradella fundamental bass notes follow the circle of fifths: note names ordered in perfect fifths. F is on one side of C and G on the other, putting the three common major chords of C major in adjacent columns. [1]
Transpose by moving the same shape
Transposition moves music to another key while preserving the intervals between notes. Move every left-hand button one column from C toward G: C→F→G→C becomes G→C→D→G. Keep each button in its bass or chord-type row and move all of them by the same number of columns. [2]
Find F, C and G from the circle among the fundamental bass buttons (B) on the right: they are neighbours in the same order. Colours mark IV, I and V on the bass and major-chord (M) rows. Changing key moves the selected columns while preserving their relative positions.
↻ Clockwise by perfect fifths
Diagram: Circle of fifths deluxe 4 · Just plain Bill · CC BY-SA 3.0
Original unchanged; IV, I and V highlights are overlaid.

Reading the circle
Outer capitals (Major) name major keys; inner lowercase letters (Minor) name minor keys. C and a on the same spoke mean C major and A minor: relative keys sharing a key signature.
From C, clockwise to G and D adds one sharp at each step. Counterclockwise to F and B♭ adds one flat at each step. Neighbouring major keys differ by one key-signature accidental.
The inner lowercase letters name minor keys, not counterbass notes. C major’s relative minor is A minor, but the counterbass in the C column is E. The minor chord in that column is Cm.
Key signatures and relative keys (Open University) · Wikipedia: circle of fifths
20 columns × 6 rows. Moving up the diagram follows the clockwise circle.
- Diminished 7th · dim
- Dominant 7th · 7
- Minor · m
- Major · M
- Fundamental bass · B
- Counterbass · CB
This is the standard two-bass-row, four-chord-row 120-button layout. Slant and spacing are simplified. Enharmonic equivalents recur at the ends. The tones and layout of 7 and dim buttons can vary by instrument. 120-bass layout reference
Starting position: the C column
Play the same progression: I → IV → V → I
C → F → G → C- IV: chord on the fourth degree
- I: the home chord
- V: chord on the fifth degree
Bass-plus-chord shapes transpose too
For Dm7, use counterbass D in the B♭ column and the adjacent F chord. Move both one column right in the diagram: counterbass A in the F column plus the adjacent C chord gives Am7. The relative positions of ① and ② stay the same.
| Column root | B♭ | F |
|---|---|---|
| Counterbass | ① D | A |
| Fundamental bass | B♭ | F |
| Major M | B♭ | ② F |
D · F · A · C
Both one column right →
| Column root | F | C |
|---|---|---|
| Counterbass | ① A | E |
| Fundamental bass | F | C |
| Major M | F | ② C |
A · C · E · G
Clockwise on the circle corresponds to up in the full 120-bass layout and right in the combination diagrams below. These are schematics of note names and relative positions.
A fifth here describes the relationship between note names. Actual Stradella pitches wrap within a limited range, so each neighboring button does not necessarily sound a literal fifth higher. F♯ and G♭ are enharmonic equivalents. [3]
The shape works where all the required buttons exist. Check the ends of the keyboard and any missing rows or columns. Transposing a whole piece also requires transposing the right hand; its fingering depends on whether it uses piano keys or buttons.
Combine a bass note with a preset chord
A preset chord is a fixed chord sounded by one button. When adding a bass note, check both the chord tones and the note you place in the bass. M means a major triad and m a minor triad; M7 in CM7 indicates a major seventh chord. [1]
C① Bass note+Em② Preset chord=CM7
- Chord-button tones
- E · G · B
- Combined pitch classes
- C · E · G · B
- ① Fundamental bass · Column root
- C → C
- ② Minor m · Column root
- E → Em
- Column distance
- 4
C + Em gives CM7 (Cmaj7). Fundamental C and Em are 4 columns apart. Counterbass C is in the A♭ column, farther away in this diagram. Avoid forcing the stretch; consider sharing notes with the right hand.
A flattened schematic of part of the layout. The bellows side is at the top; fundamental bass note names follow the circle of fifths to the right. It does not reproduce the physical slant or spacing. The 7 and dim rows are omitted. Scroll horizontally if needed.
| Column root | A♭ | E♭ | B♭ | F | C | G | D | A | E |
|---|---|---|---|---|---|---|---|---|---|
| Counterbass | C | G | D | A | E | B | F♯ | C♯ | G♯ |
| Fundamental bass | A♭ | E♭ | B♭ | F | ① C | G | D | A | E |
| Major M | A♭ | E♭ | B♭ | F | C | G | D | A | E |
| Minor m | A♭m | E♭m | B♭m | Fm | Cm | Gm | Dm | Am | ② Em |
① Bass note② Preset chord
Press ① bass and ② chord together. The numbers are not finger numbers. Column distance is a movement guide. Reach depends on your hand and instrument.
Use counterbass to reduce movement
Counterbass is the single-note row nearest the bellows. Its note name is a major third above the fundamental in the same column: E at C, A at F, D at B♭. A note available in both bass rows gives you a choice of position. [2]
Play C–D–E slowly: fundamental C, counterbass D in the B♭ column, then counterbass E in the C column. Learn the movement before adding chords.
Give bass and chords different lengths
Sounding buttons together or alternating them changes the accompaniment. These short exercises were written for this page.
- Alternate bass: play C bass → C chord → G bass → C chord over four beats, alternating the root and fifth.
- Sustained bass: hold C bass while pressing and releasing the C chord briefly. Listen to the two different durations.
- Short chords: keep the bellows moving and release the chord button early. Stopping the bellows also interrupts the right hand; try holding a right-hand note to hear the difference.
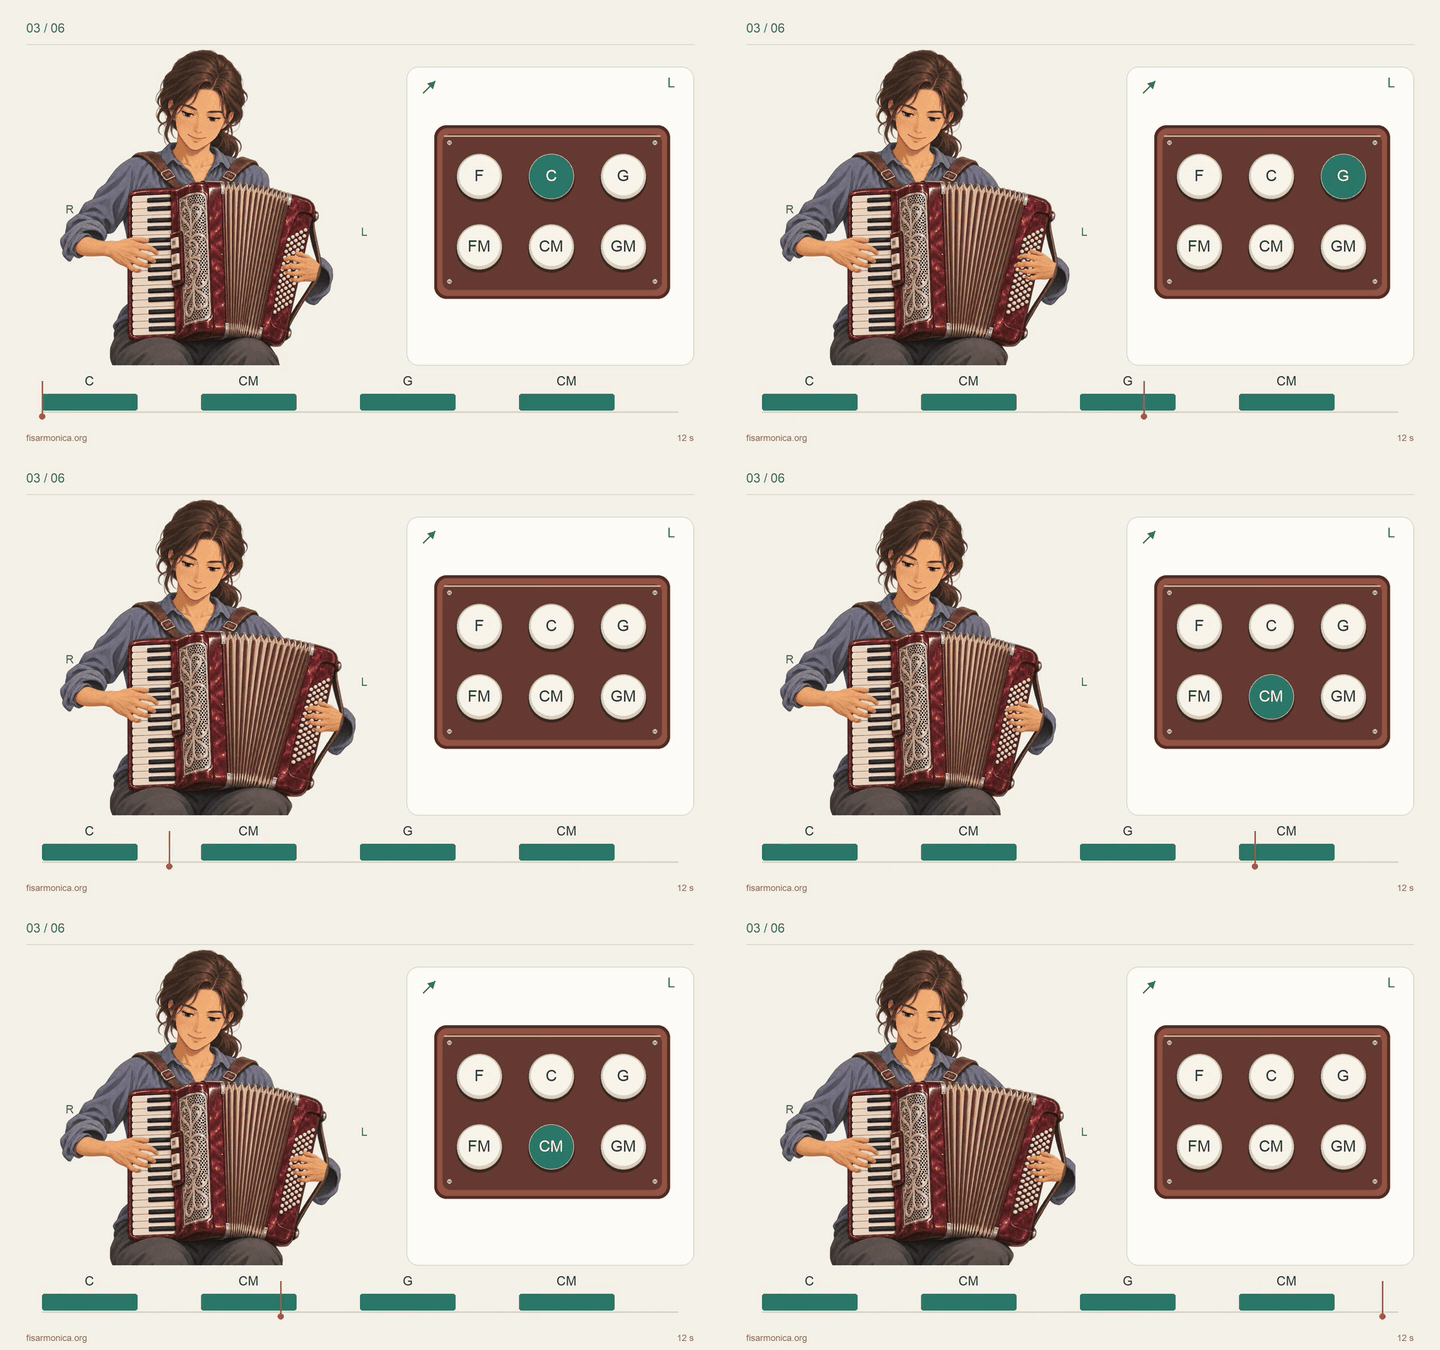
The left hand presses C bass, C major chord, G bass, then C major chord. In the close-up, only the button being pressed changes colour.
The close-up is a schematic excerpt of the bass-note and major-chord buttons. The actual slant and spacing of the buttons are omitted.
Reference demonstrations and explanations
Check the tones and the actual sound
C, E, G and B here are pitch classes: octave differences and duplicates are collapsed. Even a single-note bass button may sound several octaves at once, depending on the register. Chord range and inversion also vary with the instrument and register, so this diagram does not specify exact sounding pitches. [3]
The omitted tones and layouts of 7 and dim buttons can differ too. Check your instrument, then compare the bass, chord and combination separately. When doubling notes between hands, listen to their range and balance.
Start with Dm7
- Play counterbass D in the B♭ column and the F major chord separately.
- Press both and listen to D, F, A and C together.
- Hold D and play short F chords, then compare with releasing both buttons early.
- Move to Am7: counterbass A in the F column and the C chord, using the same shape.
4. Changing tone with registers
Register switches select combinations of reed sets. The same key can produce different ranges and thicknesses of sound. Treble reed sets are often labelled L, M and H. [6]
- L · 16′
- Low: one octave below M.
- M · 8′
- Middle: the reference pitch level.
- H · 4′
- High: one octave above M.
LM combines low and middle reeds; MM combines two middle sets. The amount of beating in MM depends on tuning. Names, symbols and available combinations vary: check your instrument and its manual.
Try it
Compare a short melody on available settings such as M, LM and MM. Add accompaniment and listen to the melody’s balance. Practise switching at a rest or phrase break first.
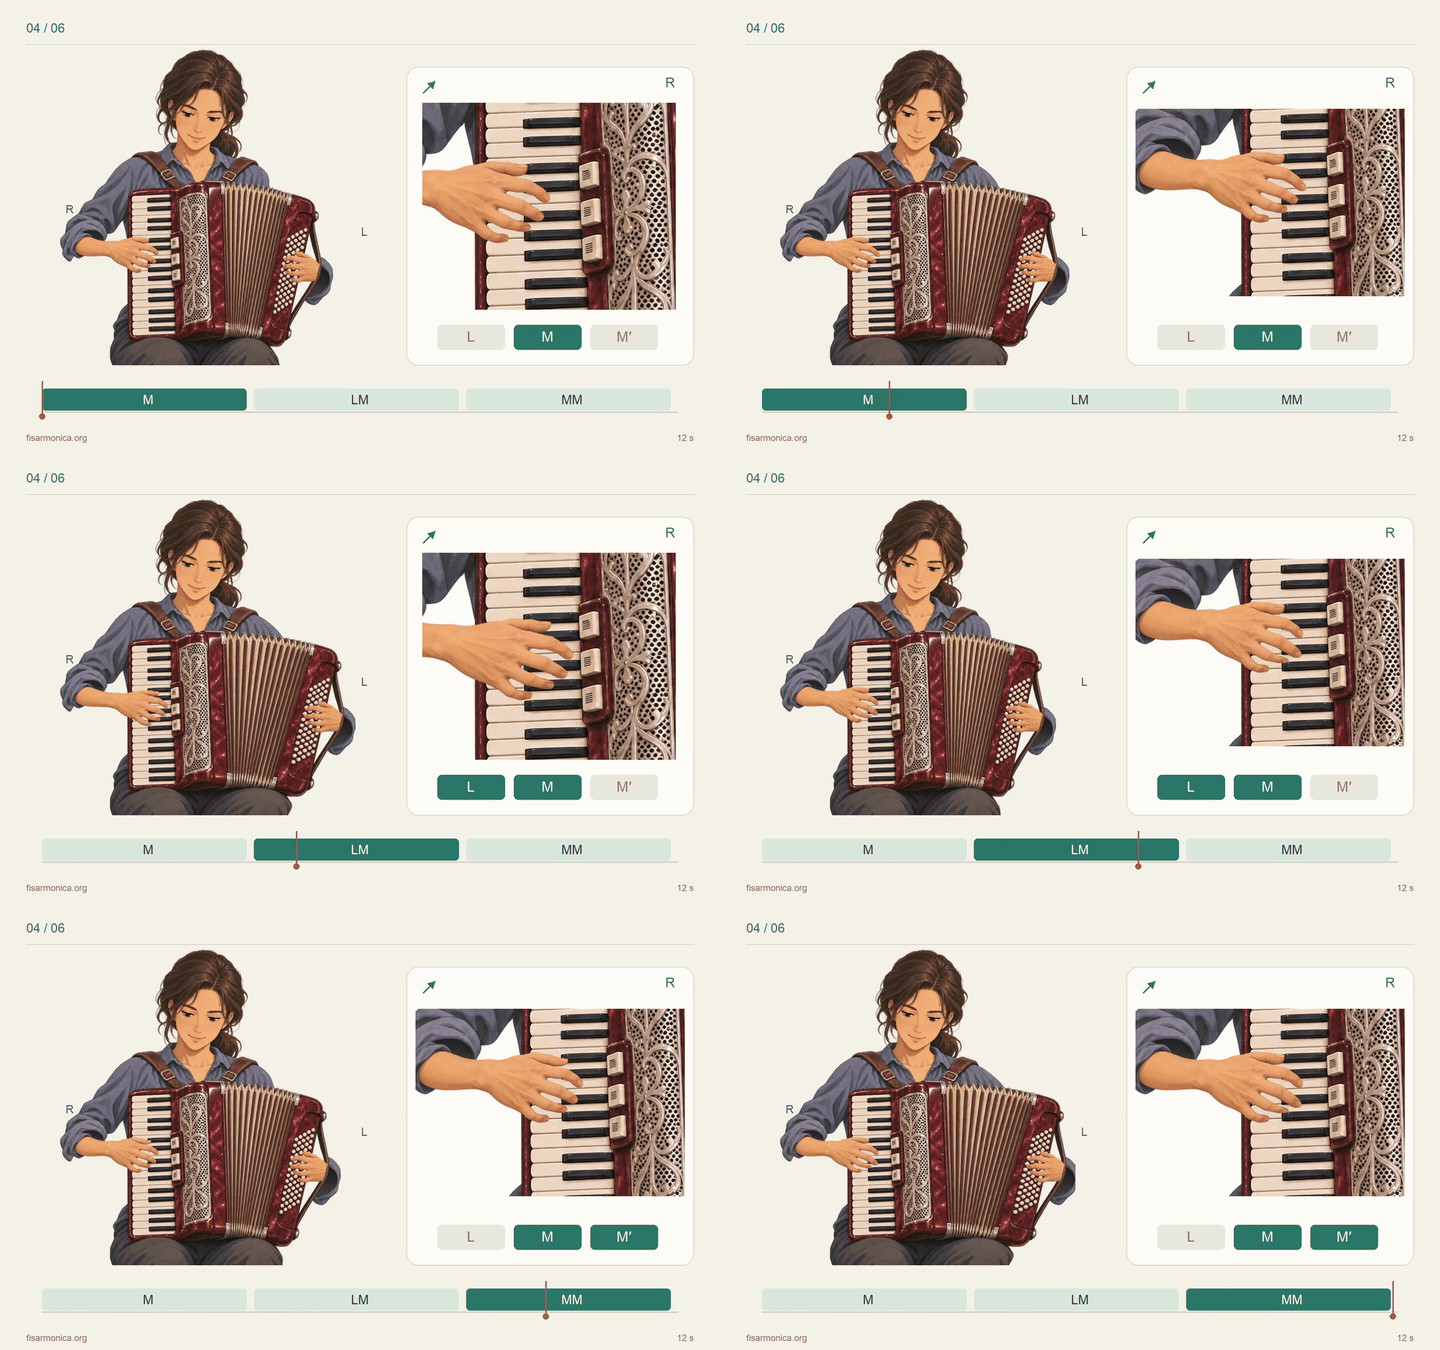
Between repetitions of a short melody, the right hand moves from the keys to a switch, selecting M, then LM, then MM. The displayed reed combinations change too.
This silent animation shows the switches and reed selection. It does not provide an audible comparison of their tone.
Reference demonstrations and explanations
5. Bellows shake
Hold a key or button while repeatedly reversing the bellows in short movements to create repeated pulses. Their attacks and releases differ from repeating a note with the fingers. [4]
Try it
Hold one right-hand note and alternate short, slow opening and closing movements. Match the duration and strength in both directions. Practise a few pulses at a time and increase speed only when the movement is steady.
Keep the instrument stable and use small movements without tightening the shoulders or wrists. Any held left-hand notes pulse too. This example assumes an instrument that plays the same pitch in both bellows directions.
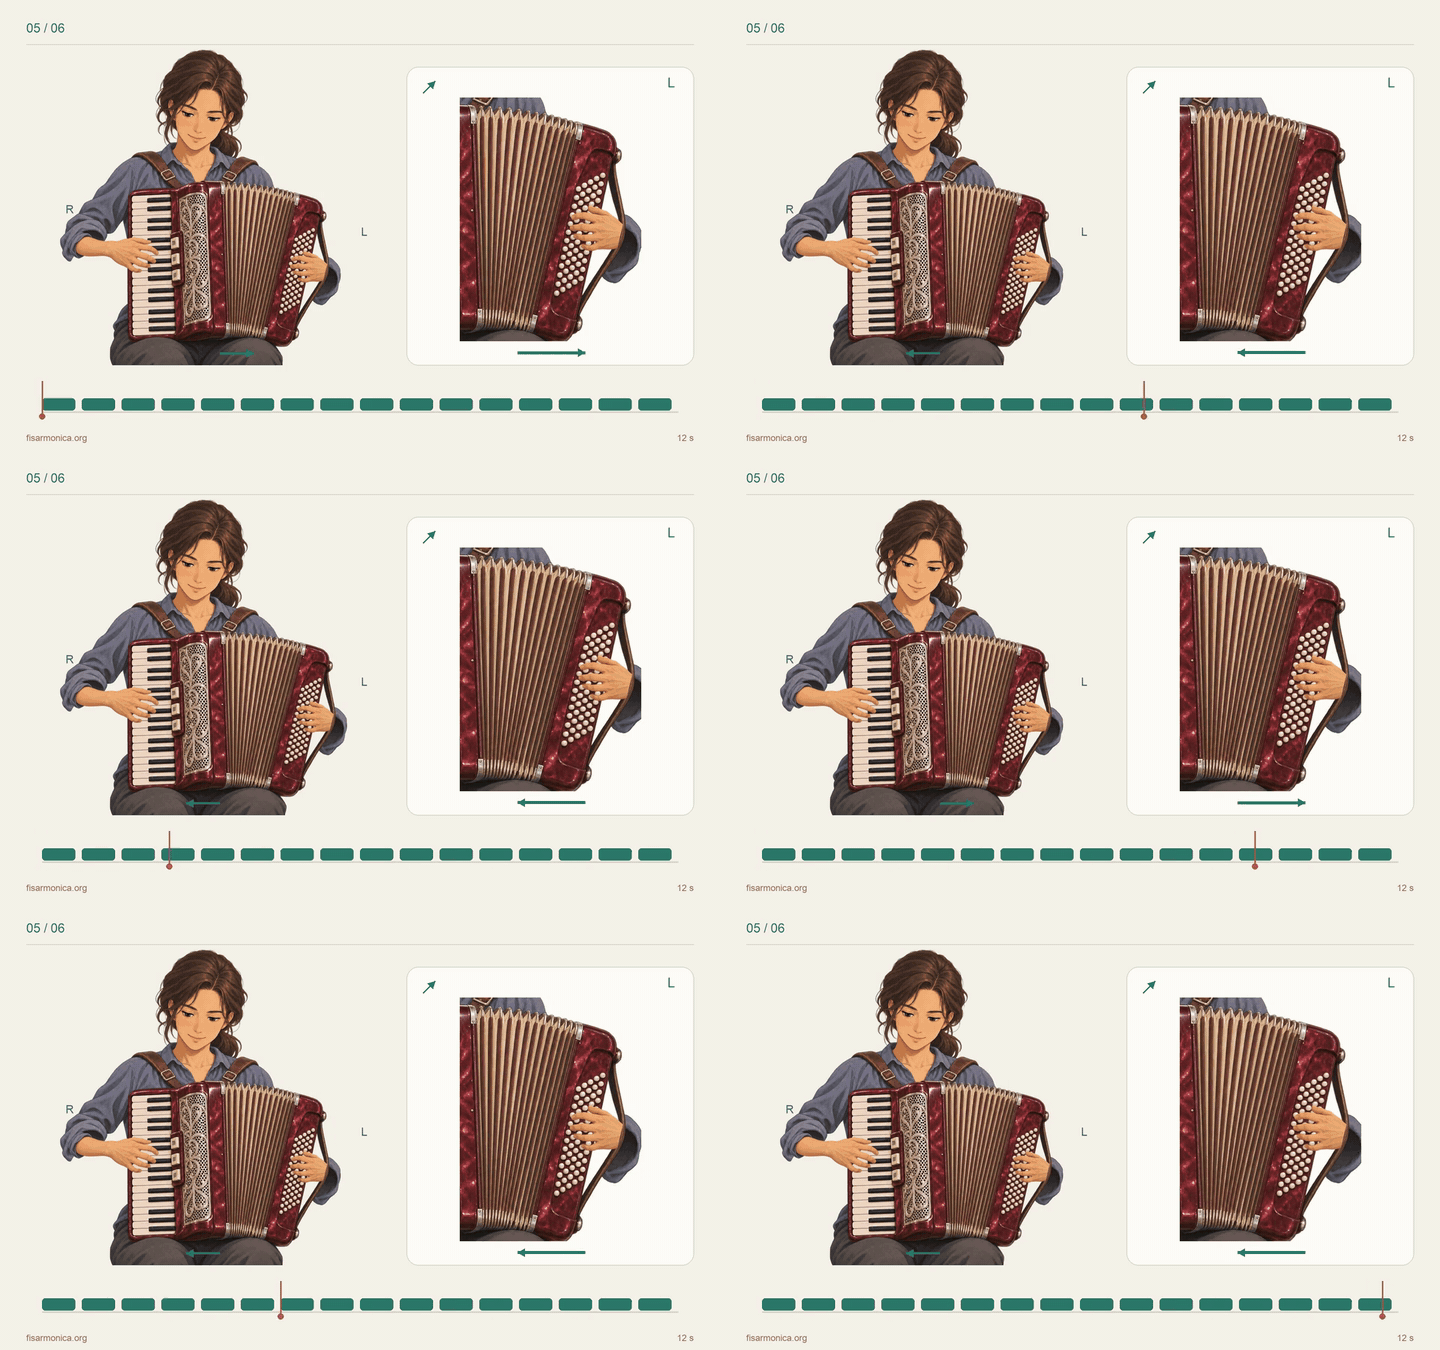
The right hand holds one key while the left arm makes small, repeated opening and closing movements. The close-up focuses on the bellows and left hand. Follow the changing arrow to see each reversal.
The movement is simplified to make the reversals visible. Actual travel and speed vary with the instrument and player.
Reference demonstrations and explanations
6. Extended technique: tapping the bellows and body
Patting the broad face of the bellows with a palm can add percussive sounds. Players also tap the hard casing with fingers or palms; the contact point and touch change the sound. These sounds can mark a rhythm or punctuate gaps between phrases without playing the keys. [7] [8]
Contact points and force depend on the instrument’s materials, construction and condition. Check with an experienced player or repair technician and begin with light contact. For this exercise, use no fingernails or hard objects and avoid concentrating force on bellows corners or metal fittings.
Try it
Keep the instrument stable with the bellows slightly open and count four beats. Without pressing keys or buttons, gently touch and release the agreed bellows surface with your palm on beats 2 and 4, making a pulse from the taps.
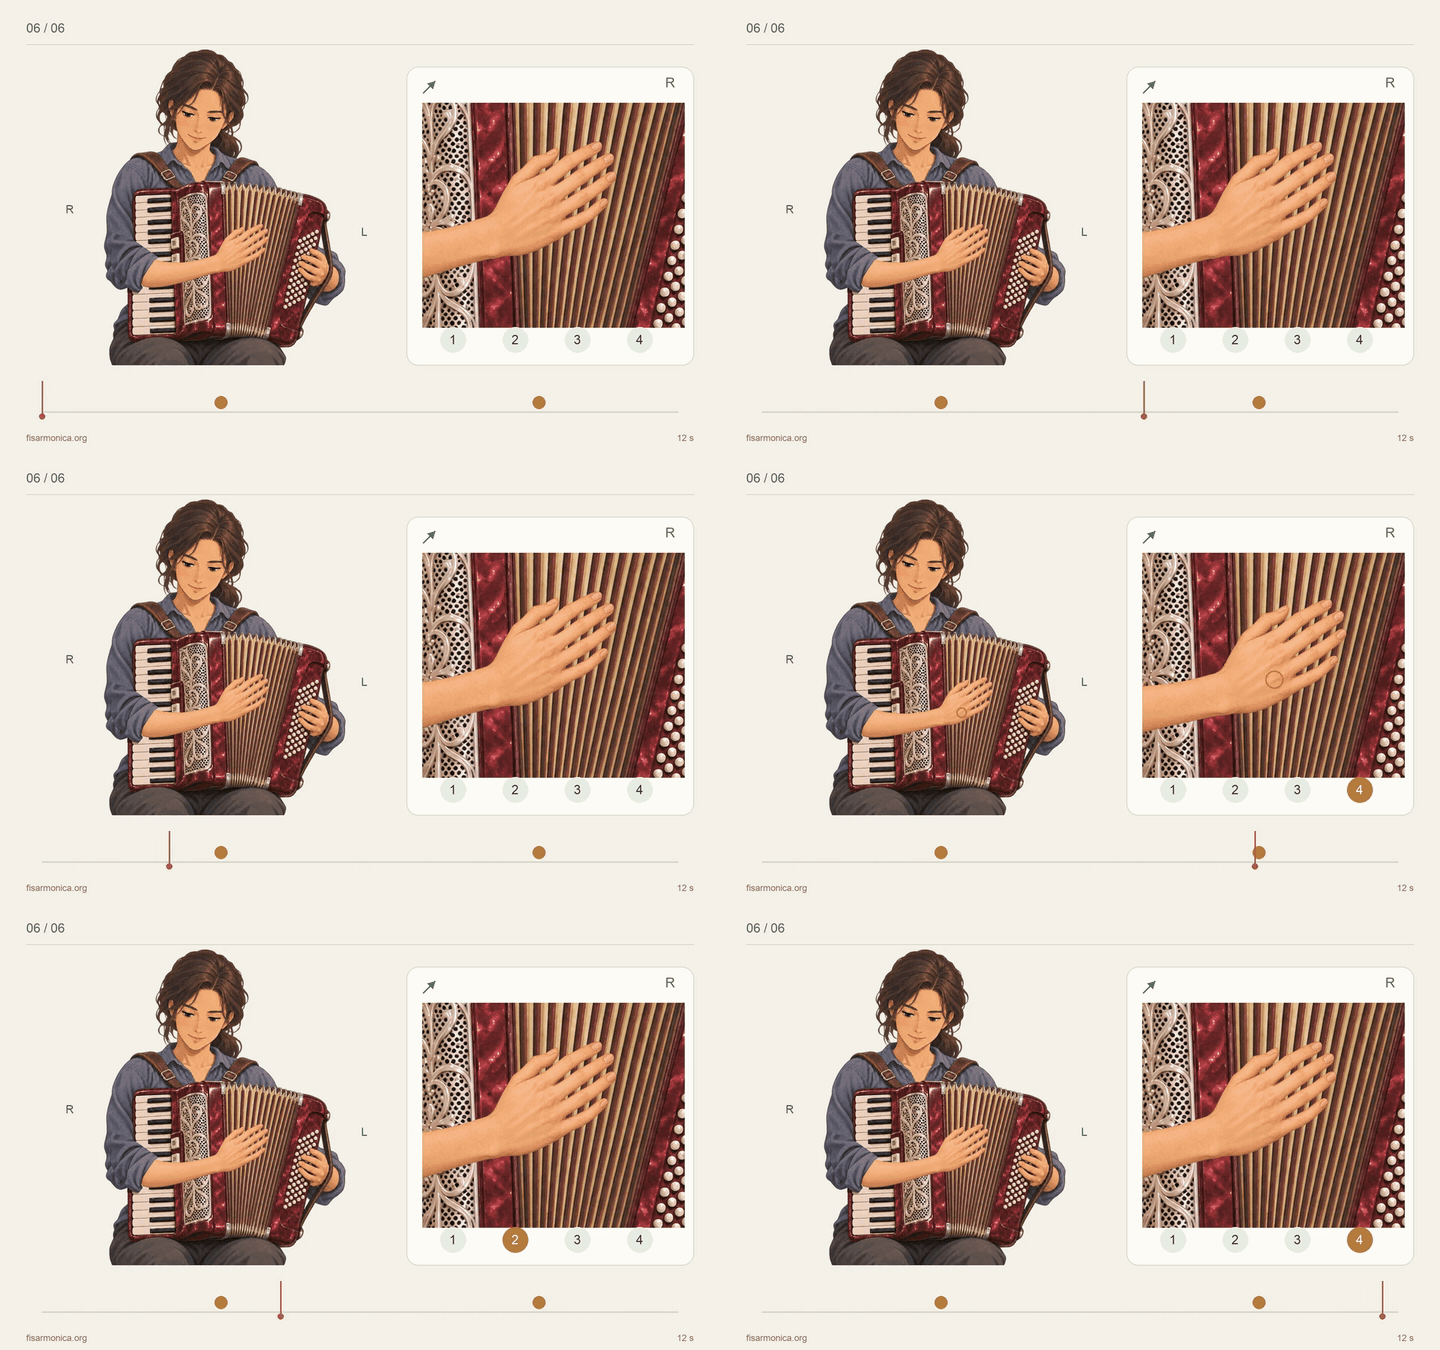
The right hand reaches across to the broad face of slightly open bellows and gently pats it on beats 2 and 4. The close-up shows contact and release, with a marker at contact.
This diagram illustrates movement and contact position. Suitable places and force vary by instrument. The animation is silent.
Reference demonstrations and explanations
Sources
- Accordion Chords — 120 Bass Accordion Chart
Bass, counterbass and preset-chord combinations and layouts.
- George Whitfield — Accordion Bass Scales: C Major
Scales and bass lines using counterbass.
- Donald Balestrieri — Registers of the Standard Stradella Keyboard
How registers affect range, inversion and octave doubling.
- Gorka Hermosa — Accordion Technique Notebook (PDF)
Bellows dynamics, direction changes and bellows shake, printed pages 6–10.
- Shelia Lee — Bellow Technique: Phrasing
Coordinating fingers and bellows in legato, staccato and phrasing exercises.
- Liberty Bellows — General Accordion Questions
L, M and H reed combinations, tone and tremolo tuning.
- Felix Kroll — The Accordion: Composers–Guide (PDF)
Tapping and stroking the bellows, and striking wooden parts of the body with fingers or palms. “Percussion”, PDF page 18.
- Luca Piovesan — ACCORDION4COMPOSERS (PDF)
Distinguishes slapping semi-open bellows, drum-like bellows knocks and casing knocks. Chapter 7, “Noises”, PDF page 31.